Odoo offers users the ability to customize their websites with tailored pages using XML code. This functionality enables website owners to tailor their sites to meet specific business needs, ensuring flexibility and customization.
In this blog post, we'll explore the straightforward process of crafting distinctive pages in Odoo, providing users with a unique and meticulously crafted online identity.
Tailored pages play a vital role in enhancing user experience and meeting particular business demands. Utilizing XML code, a markup language esteemed for its capacity to generate dynamic and interactive content, these pages empower Odoo users to devise layouts that seamlessly integrate with their current websites. The versatility afforded by XML code enables users to fashion pages suited to their distinct needs, thereby augmenting the website's overall functionality and attractiveness.
To kickstart the process of crafting custom pages, it's essential to understand the basic components of the XML code structure. The <record> tag acts as a foundational element for delineating custom pages in Odoo. Within this tag, attributes such as name, type, URL, website_indexed, is_published, and arch assume pivotal roles in defining various aspects of the page. These attributes enable developers to customize the page's functionality and appearance to suit their needs effectively.
Let's delve into crafting a custom web page using XML. Check out this simple example:
<?xml version="1.0" encoding="utf-8"?>
<odoo>
   <record id="my_page" model="website.page">
       <field name="name">My Page</field>
       <field name="type">qweb</field>
       <field name="url">/my-page</field>
       <field name="website_indexed" eval="False"/>
       <field name="is_published">True</field>
       <field name="key">module_name.my_page</field>
       <field name="arch" type="xml">
           <t name="my page" t-name="my_page">
               <t t-call="website.layout">
                   <div class="container">
                       <h1>Hello, Odoo 17!</h1>
                       <p>Welcome to my custom page in Odoo   17. This is just a
                           demo page.
                       </p>
                   </div>
               </t>
           </t>
       </field>
   </record>
</odoo>
In this provided example, we're designing a unique web page titled "My Page," associated with the URL "/my-page." The page's content is encapsulated within a <div>, containing both a header and a paragraph for a clear and structured presentation.
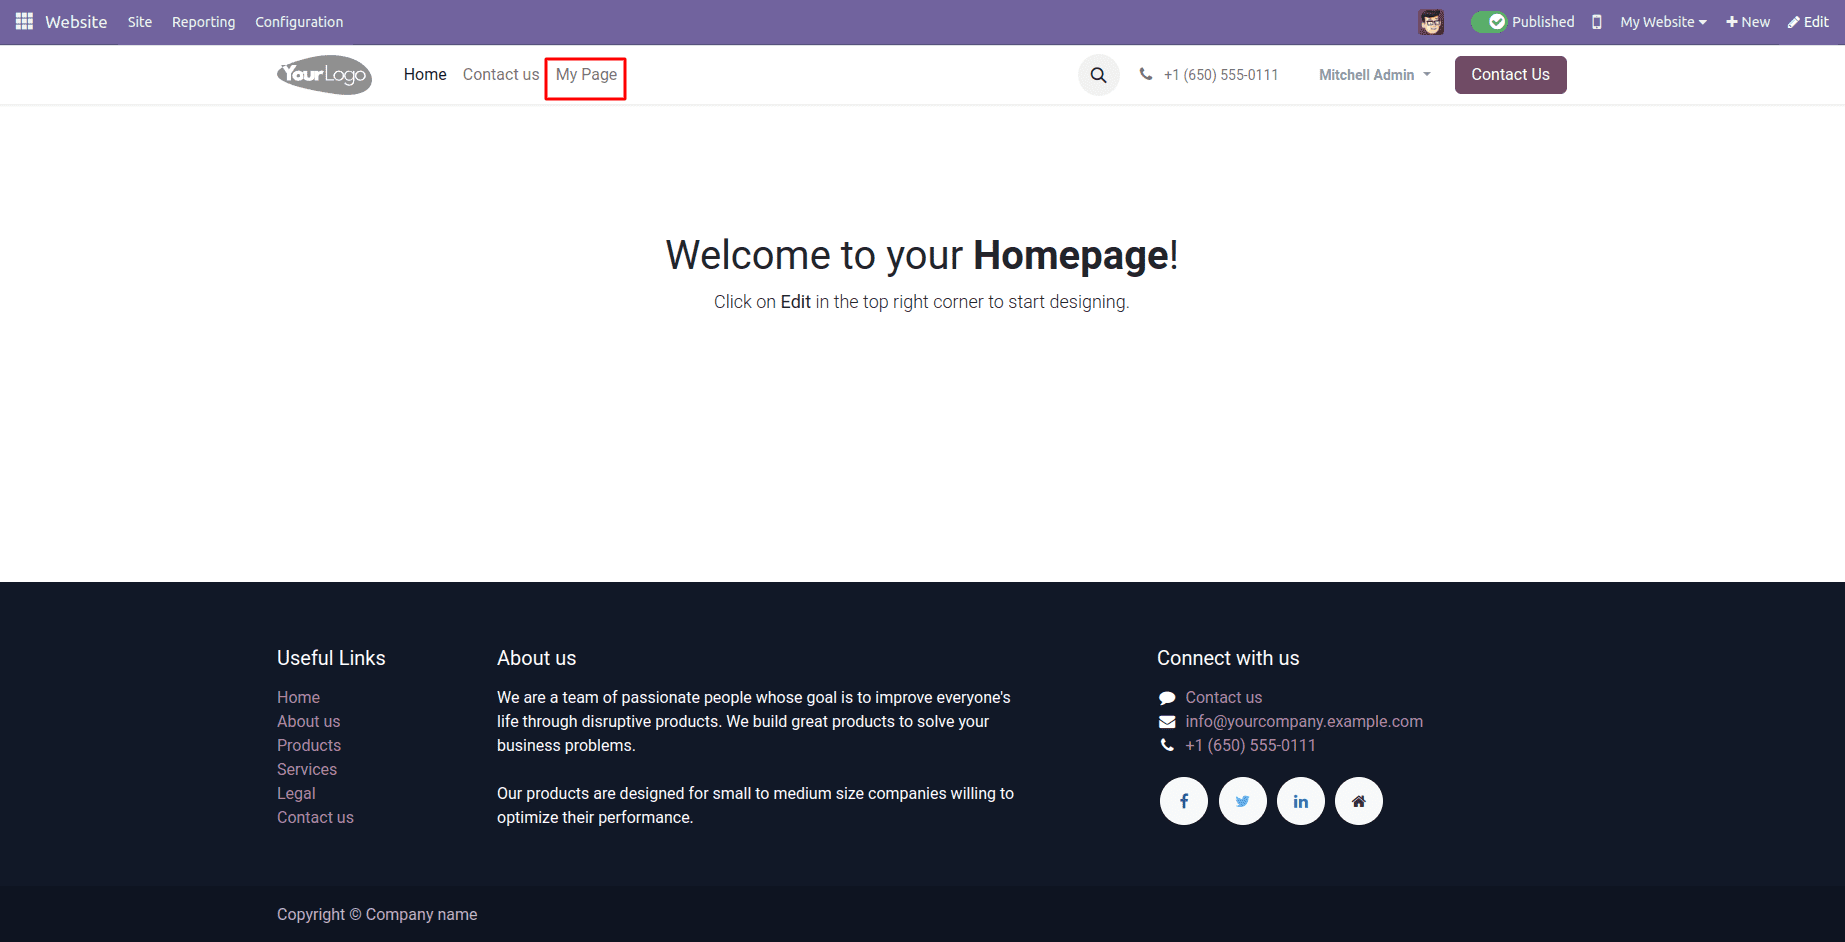
To guarantee convenient access for website visitors to our custom page, we need to establish a link through a menu item. This is achieved by creating a new menu item and linking it to our custom page.
<record id="menu_my_page" model="website.menu">
   <field name="name">My Page</field>
   <field name="url">/my-page</field>
   <field name="page_id" ref="module_name.my_page"/>
   <field name="parent_id" ref="website.main_menu"/>
   <field name="sequence" type="int">60</field>
</record>
The provided code creates a menu item titled "My Page" and links it to the custom page we previously defined. Consequently, the resulting menu will resemble the image shown below:
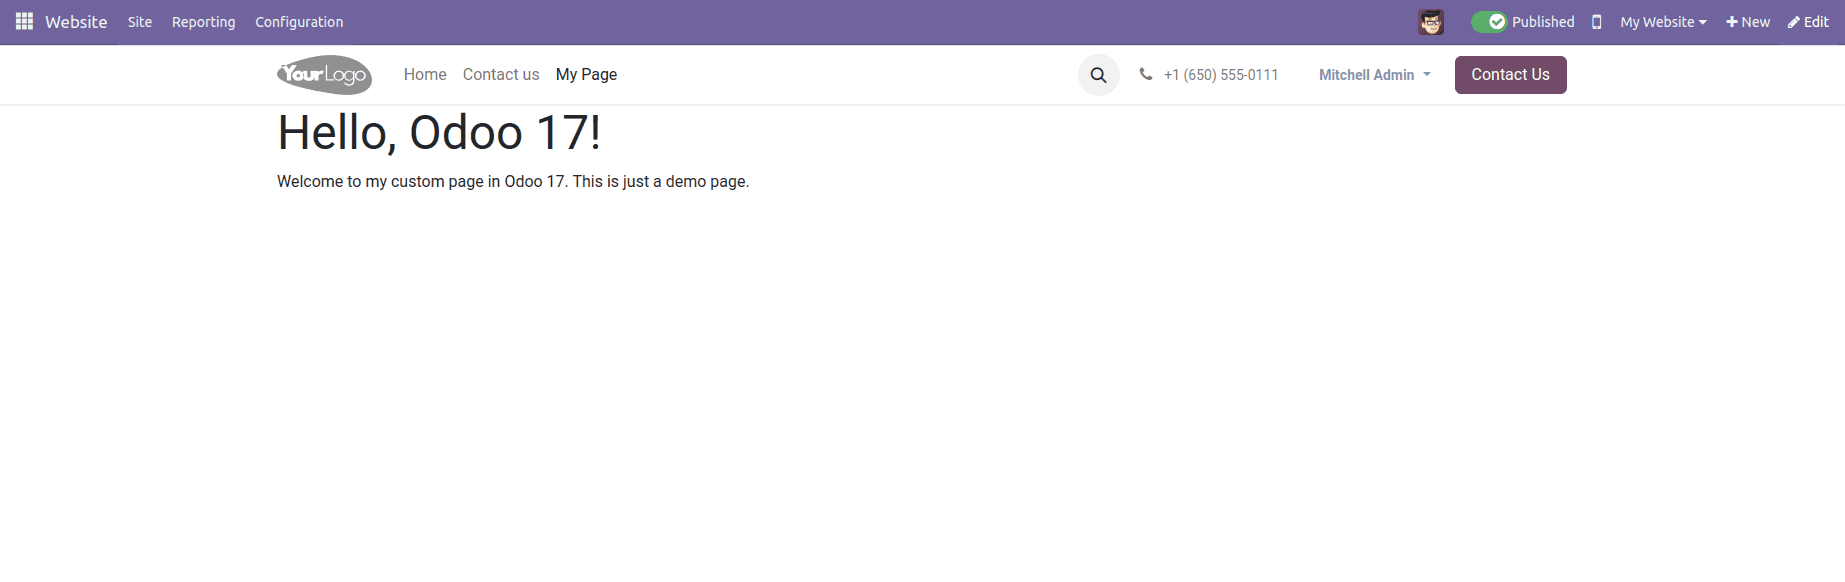
Upon choosing this menu option, you'll be seamlessly directed to the created page, providing the experience depicted in the image below.
In Odoo 17, the scope for crafting custom pages broadens, presenting advanced features and customization options. Delve into the utilization of QWeb templates to build complex and dynamic pages, and delve into the inheritance mechanism to uphold a uniform visual identity throughout the entire website.
Observing best practices remains crucial when designing custom pages in Odoo 17. Utilize clear and descriptive names for elements, uphold a well-structured code format, and adhere closely to Odoo's coding standards to guarantee the sustainability and expansibility of your online presence.
Developing custom pages in Odoo 17 using XML code equips website owners with the tools to customize their online platforms according to their precise business needs. By mastering XML code structure and leveraging advanced features, Odoo users can adeptly craft distinctive and engaging custom pages, enriching the overall online experience for their audience.
Now, let's explore the process of configuring a mega menu in Odoo.
In Odoo 17, incorporating a mega menu can greatly enhance user engagement and streamline website navigation. This advanced dropdown menu variant offers users swift access to different sections or pages.
Before diving into technical details, it's crucial to grasp the fundamental framework of a mega menu in Odoo. The mega menu is defined within a "website.menu" record, utilizing various HTML elements and classes to attain the desired layout and design.
<?xml version="1.0" encoding="utf-8"?>
<odoo>
   <record id="menu_events" model="website.menu">
       <field name="name">Event Management</field>
       <field name="url">/events</field>
       <field name="parent_id" ref="website.main_menu"/>
       <field name="sequence" type="int">20</field>
       <field name="is_mega_menu">True</field>
       <field name="mega_menu_content" type="html">
           <section class="event-section">
               <div class="container">
                   <div class="row py-4">
                       <div class="col-lg-12">
                           <h3 class="mb-3">Upcoming Events</h3>
                           <ul class="list-unstyled">
                               <li>
                                   <a href="#" class="text-dark d-flex align-items-center text-decoration-none">
                                       <span class="fa fa-caret-right mr-2"></span>
                                       <span>Event 1</span>
                                   </a>
                               </li>
                               <li>
                                   <a href="#" class="text-dark d-flex align-items-center text-decoration-none">
                                       <span class="fa fa-caret-right mr-2"></span>
                                       <span>Event 2</span>
                                   </a>
                               </li>
                           </ul>
                       </div>
                   </div>
               </div>
           </section>
       </field>
   </record>
</odoo>
Now, let's dissect the code explanation:
* <record id="menu_events" model="website.menu">: This line initializes a fresh record of the "website.menu" model under the identifier "menu_events."
* <field name="name">Event Management</field>: Assigns the visible name of the mega menu as "Event Management."
* <field name="url">/events</field>: Specifies the URL associated with the mega menu item, directing to "/events."
* <field name="parent_id" ref="website.main_menu"/>: Indicates that the mega menu item is a subcategory of the menu item labeled "website.main_menu," placing it below the main menu.
* <field name="is_mega_menu">True</field>: Confirms that this menu item is a mega menu by setting the field to "True."
* <field name="mega_menu_content" type="html">: Holds the HTML content that delineates the structure and components of the mega menu.
* <section class="event-section">: Sets up a section styled with the CSS class "event-section" to format the mega menu content.
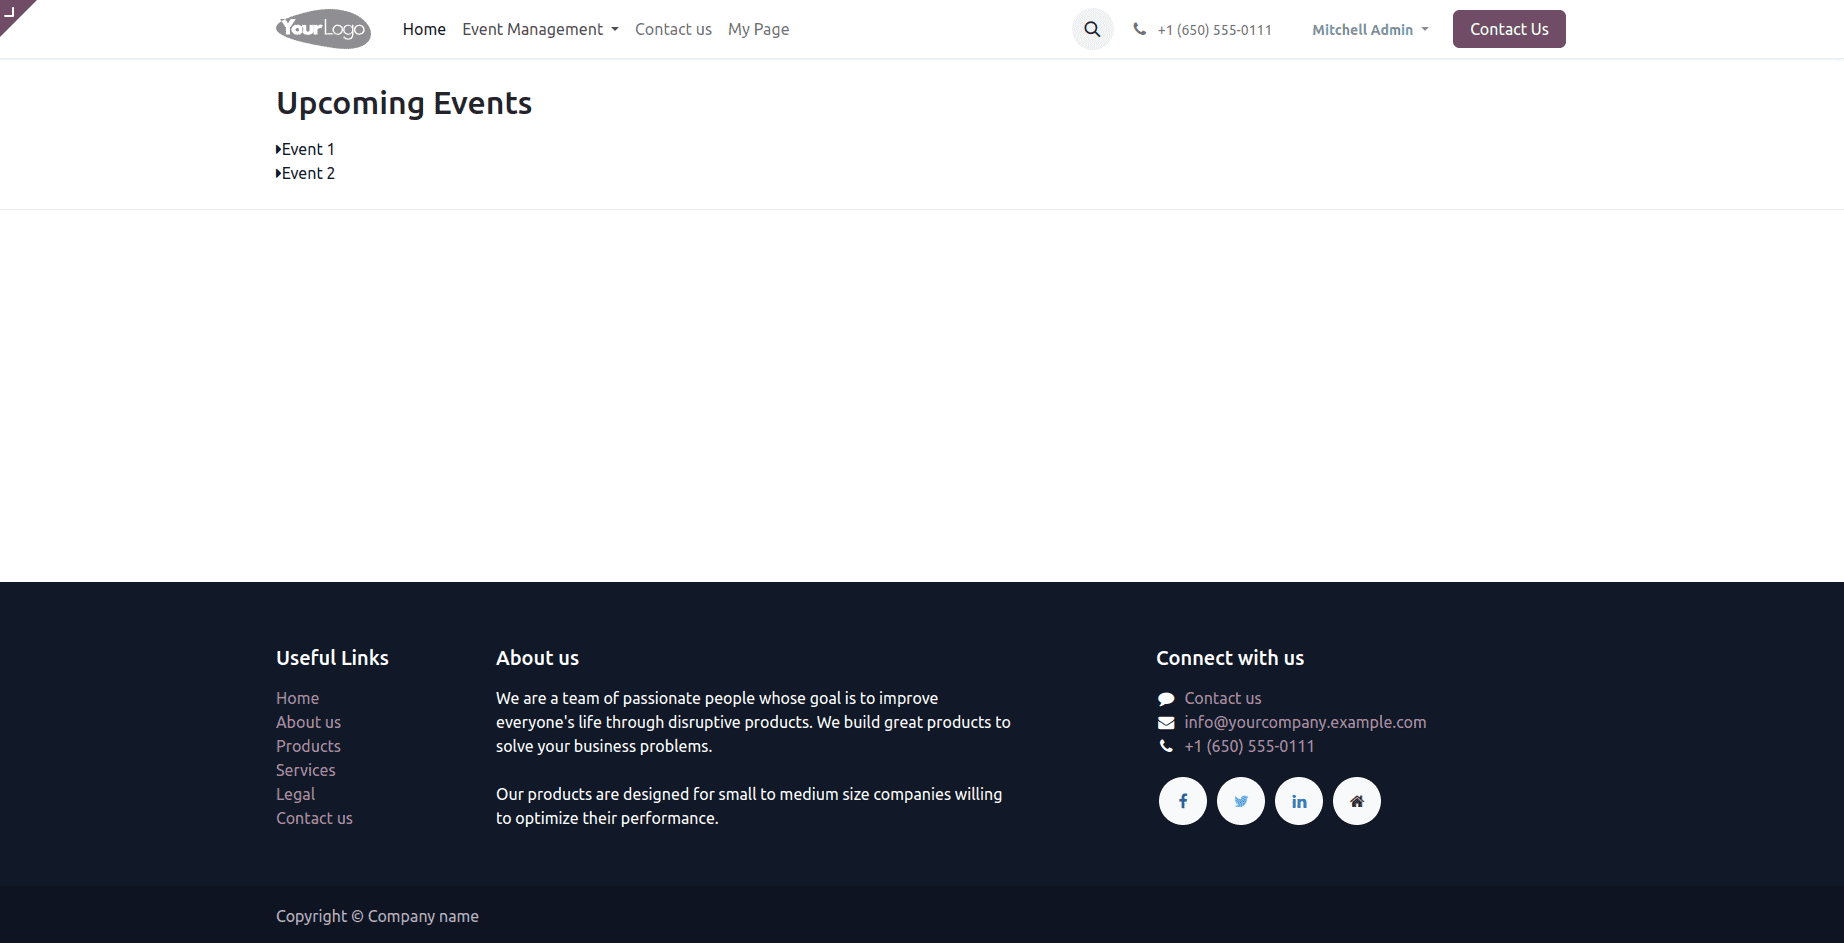
The mega menu, depicted in the image below, will have the following visual presentation.
Mega menus offer an excellent solution for effectively structuring and presenting a significant amount of information on your website. This improves user navigation, allowing them to quickly find the information they need. Feel free to explore different layouts, styles, and content options to create a mega menu that perfectly fits the unique requirements of your website.